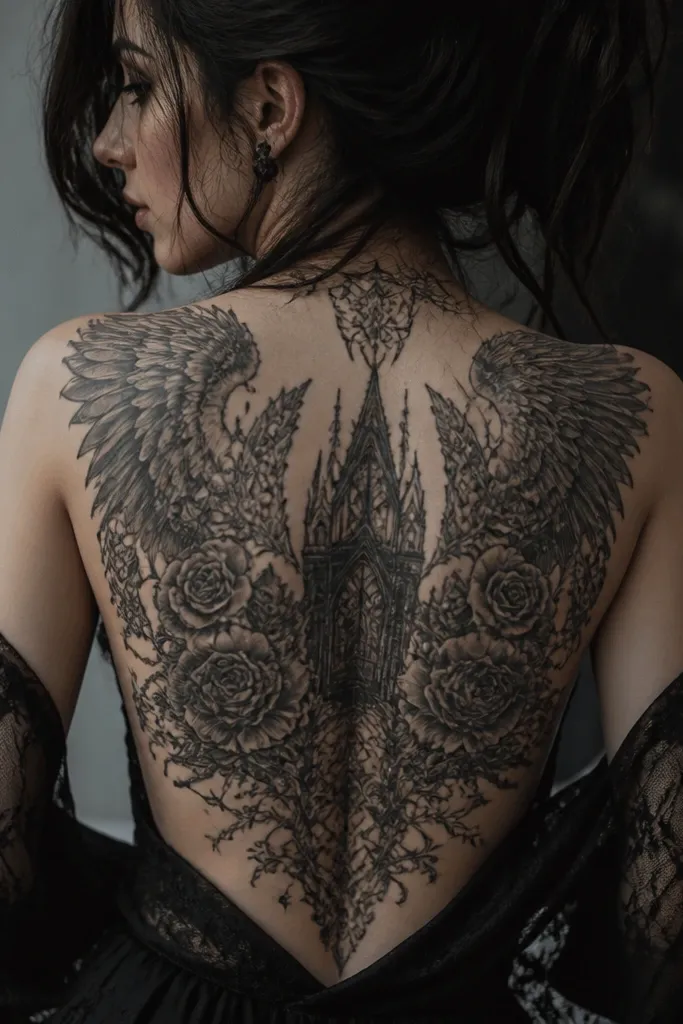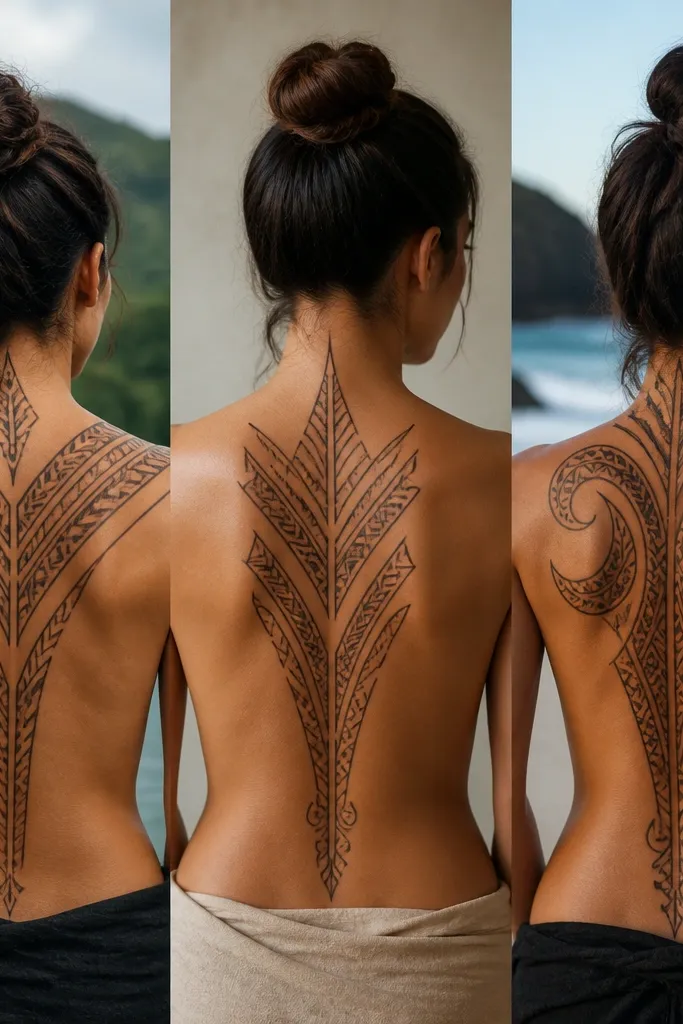
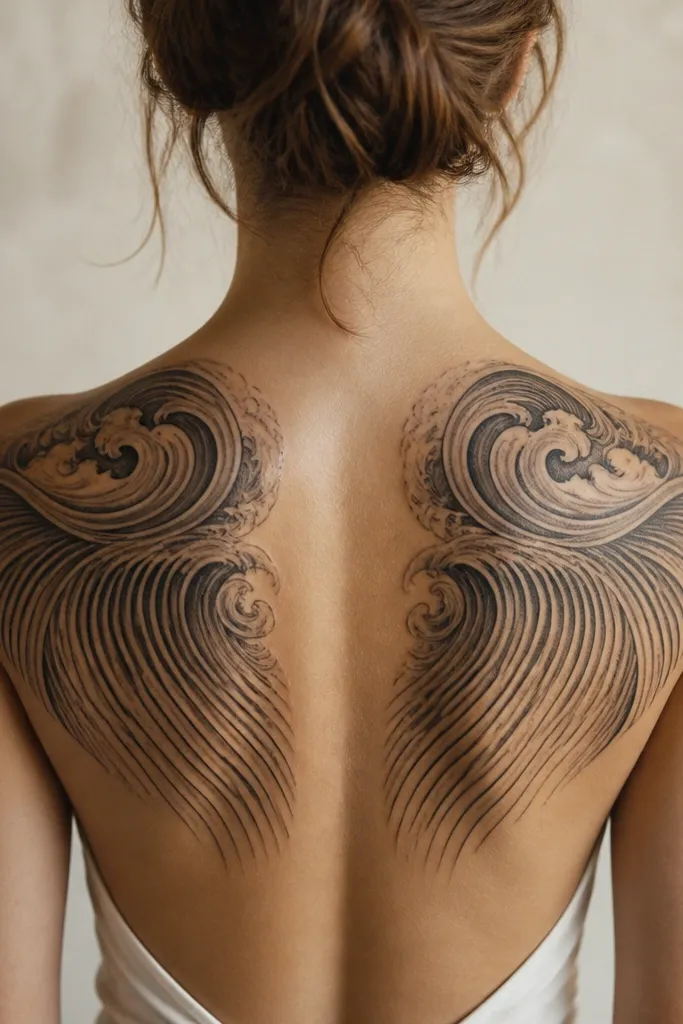
1. Samoan wave spine ladder
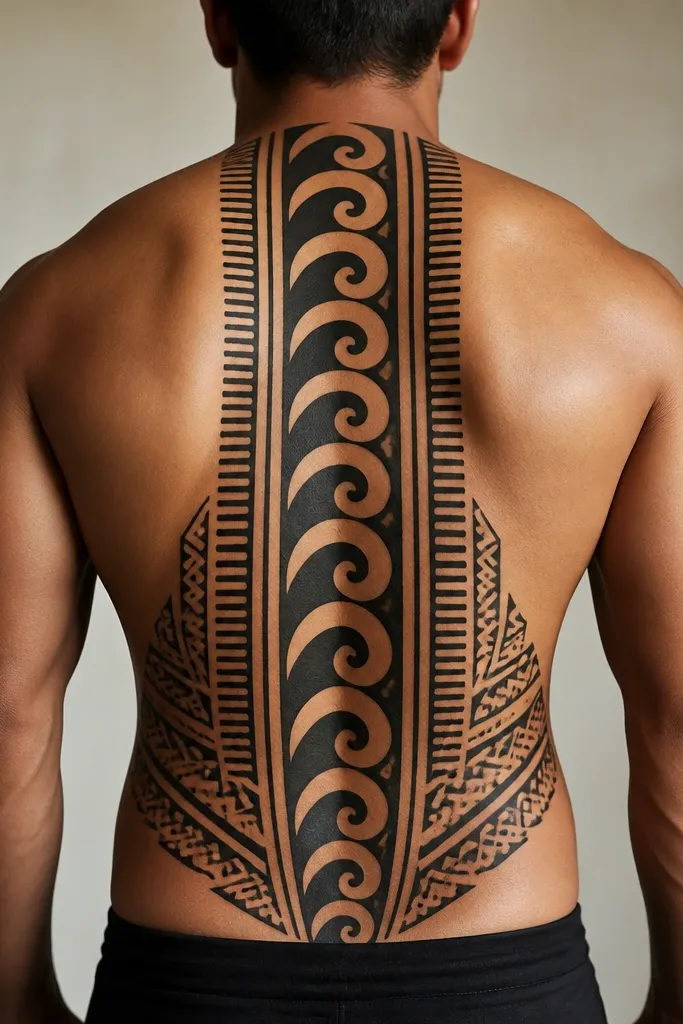
This one looks good because the wave bands create a natural optical "lengthening" effect from bra line up to mid-lower back. The comb side lines act like rails, so the tattoo reads structured even when your body shifts in photos. I like it for women who want Polynesian style without a huge face or animal element. Heavy line weight keeps it bold even after a few years of sun exposure.
Ask for a draft that starts about 1.5-2 inches below the shoulder blade notch and ends around the top of the waistband line. Keep the center spine about 1.25-1.5 inches wide at the widest point, then let it taper slightly as it drops. Use mostly solid black for the wave bands, with negative space between bands to keep the design breathable.
Pro tipBring two reference photos: one standing square, one slightly turned. If the waves still look centered when you turn, you've got a placement that will hold up in real life.
AvoidDon't let the comb lines spill too close to the armpit crease - that's where it turns into a blurry mess fast.
2. Turtle anchor with wave halo
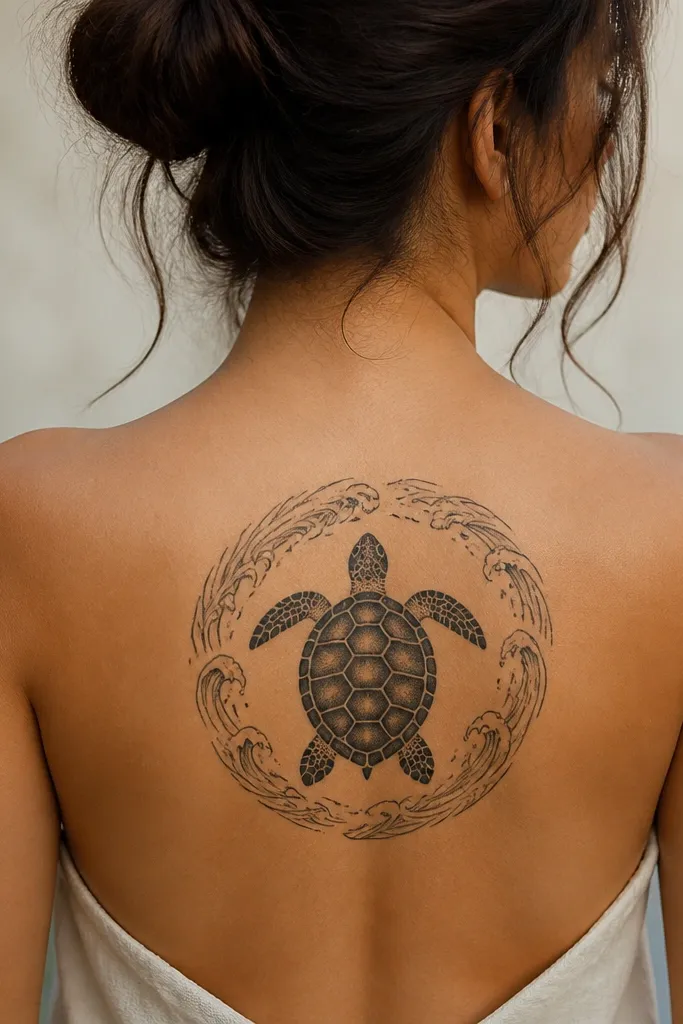
A turtle works because it gives the tattoo a focal "weight" in the middle, and the wave halo adds motion without overcrowding your whole back. I've seen couples match turtle anchors and it still feels personal because the halo can be drawn with different density on each person. The heavy outline makes the turtle stay readable even as fine lines soften with time.
Place the turtle between the shoulder blades and lower rib area, usually spanning about 6-8 inches tall. Keep the halo waves wider at the top and narrower at the bottom so the ring doesn't look like a sticker. Ask for a bold outline around the turtle shell, then switch to medium line weight for the halo waves.
Pro tipIf you want it to feel more feminine, request slightly curved wave arcs instead of sharp zig-zag corners.
AvoidSkip ultra-thin outline for the turtle. Thin outlines heal inconsistently and can disappear into the skin texture.
3. Peacock shell panel (upper back drama)
This style reads dramatic because it pulls the eye upward with a fan-like top edge, then guides it down to a narrower tail. The shell/feather feel is very Polynesian when the lines curve in the same direction as your shoulder blade contour. If you wear off-shoulder tops, this one looks extra good because the top edge sits right where fabric exposes skin.
Keep the tallest point near the upper shoulder blade area, roughly 2-3 inches below the base of your neck. The panel should be about 8-10 inches wide at the widest fan section, then taper to 4-5 inches near the mid-back. Choose dense black linework for the main panel and add lighter shading lines only inside the curves.
Pro tipAsk the artist to draft the panel so the "fan" edge follows your shoulder blade curve, not your spine. That small adjustment is what stops it from looking flat.
AvoidDon't go too wide at the top. If it crosses too close to the side seam of your shoulder, it fights your body shape.
4. Maori block geometry with soft spacing
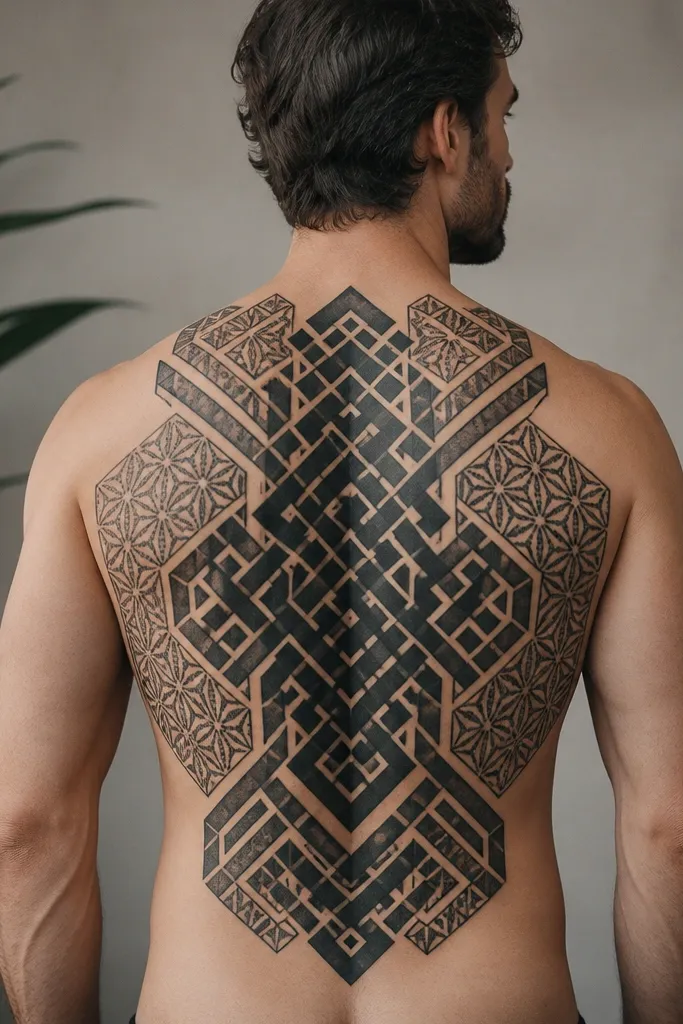
Geometric blocks look sharp because you get clean edges and predictable healing. The soft spacing - where blocks don't touch - keeps it from turning into one big black smear as your skin moves. I like this for women who want Polynesian style but hate the idea of tiny linework all over their back. It also photographs well in different lighting because the negative space catches highlights.
Request a staggered grid so the blocks align diagonally across the shoulder blades. The center band should be wider than the outer bands by about 1.5-2 inches, so the tattoo has a clear focal axis. Use solid black fills for the dark blocks, and leave 1/4 inch gaps for the negative space lines.
Pro tipChoose a placement that leaves a small buffer from your bra strap line - those edges get rubbed and you'll want the crisp geometry preserved.
AvoidDon't pack the blocks edge-to-edge. If the gaps are gone, the design loses its structure.
5. Fine-line tiki cameo (upper third)
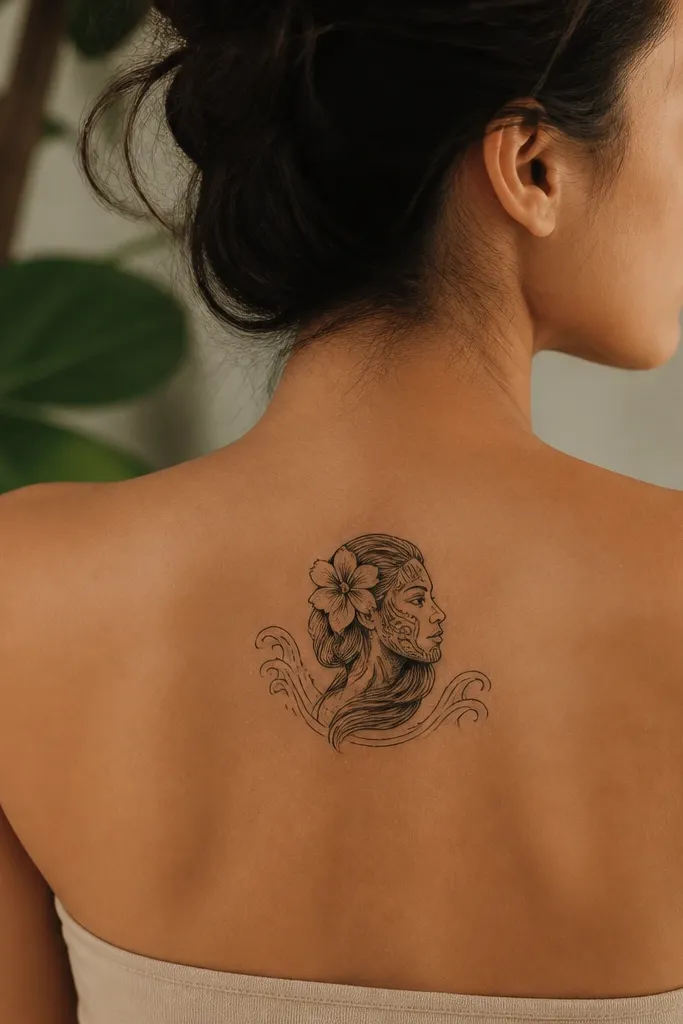
A cameo works when you want Polynesian without committing to full coverage. Fine-line engraving gives that "inked in" look - especially when the shading is built with short, controlled hatching marks. This is the style I recommend for people who want a matching set but don't want both backs to be equally dense. The cameo also sits nicely under open-back tops because it's in the upper exposure zone.
Keep the cameo height around 5-7 inches so it doesn't balloon visually on a back. Place it centered over the upper spine but let it sit 1-2 inches closer to one shoulder blade for a more natural look. Add two or three small wave accents at the edges to connect it to the rest of the back design.
Pro tipPick an artist who has healed examples of fine-line blackwork on large areas. You want to see how their lines hold after a year, not just right after the session.
AvoidSkip very dark, fully filled backgrounds with fine-line work. It can look muddy as it heals.
6. Double-sided half-back symmetry set
This is the matching-couples favorite because symmetry makes it feel intentional even when you see it from the front or from a side angle. The trick is leaving enough negative space around the center so the two sides don't merge into one thick block. I like pairing this with different motif density for each person - same overall layout, different "personality."
Draw the center spine band first, then mirror the side elements with a draft overlay. Each half should cover roughly 9-11 inches from center spine to outer shoulder blade edge. Keep the bottom ends aligned near the top of the waistband line so both halves "land" at the same height.
Pro tipWear a fitted bra or supportive bralette to your consult. You need the placement to match how fabric sits on your shoulders.
AvoidDon't force perfect mirror symmetry if your shoulder blades sit at different heights. Artists should mirror the design, not your anatomy.
7. Half-back waves with negative space breathing
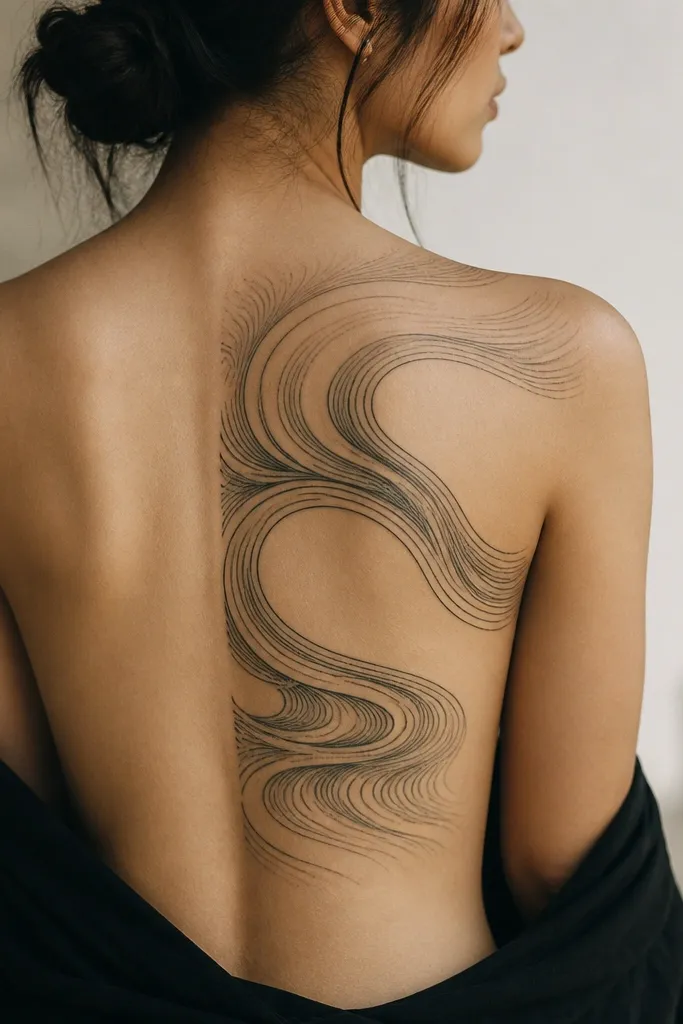
Negative space changes everything. With this style, the tattoo looks lighter and more refined because your skin shows through the gaps, especially in daylight. It still reads Polynesian because the wave repetition stays consistent, but it won't feel heavy under clothing. This is a great seasonal_evergreen pick if you plan to wear sleeveless tops - the design stays readable without needing full back coverage.
Place it on one side of your back, usually from mid-spine to the outer shoulder blade edge, about 10-12 inches long. Ask for wave bands that are thick enough to hold, but keep gaps wide - around the width of a standard coin gap in the design mockup. Finish with one or two curved "terminations" near the outer edge so the tattoo doesn't look cut off.
Pro tipRequest a clean fade in line density from center to edge. That keeps it from looking like a stencil slapped on.
AvoidAvoid tiny wave gaps. If the negative space is too narrow, it closes up as skin stretches and heals.
8. Full back tribal map density
Full density works when the artist creates zones - dark centers, medium transitional areas, and lighter edge elements. Without zone planning, full backs can look flat or like a single dark sheet. I've had this style on a friend's consult and watched how the right shading transitions kept the design readable even from across the room. If you want maximum impact for photos and special events, this is the category.
Commit to a layout that covers from just below the neck line down to the top of the hip bone area, typically 16-20 inches. Ask for a "map" draft with at least three density levels so it doesn't blur. Plan your sessions: split into upper and lower halves, because your body will let you tolerate it better.
Pro tipIf you want it to look expensive, ask for crisp terminations where each density zone ends - not rounded smudges.
AvoidDon't accept a design that has no lighter breaks. Dense-only work heals heavy and can age into a uniform dark area.
9. Shoulder blade comb frame with spine focus
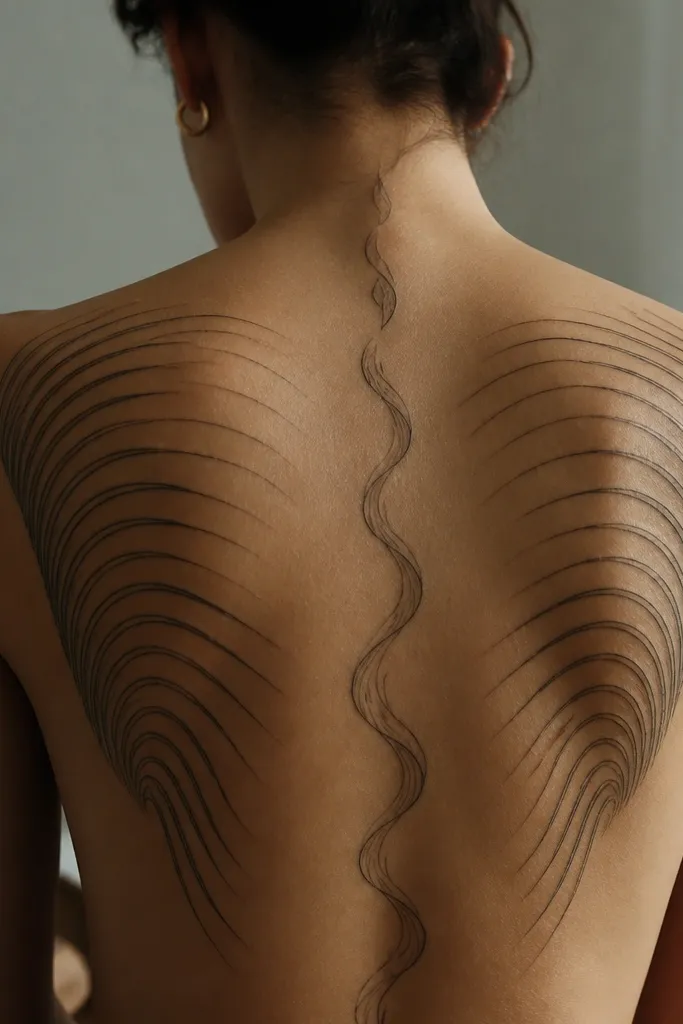
Comb frames give a polished look because they outline your shoulder blade shape like a garment seam. The thinner wave spine keeps it from feeling too harsh, and the negative space in the center makes the whole piece look intentional. This style is a strong pick for women who want Polynesian symmetry without going fully dense over the whole back.
Keep the comb frame higher on the shoulder blade, starting about 1 inch below the top of the scapula. Let the frame taper as it approaches the mid-back, so it doesn't stick out when you sit. Use solid black comb lines and keep the center spine thinner with wider negative gaps.
Pro tipAsk for a mockup that shows your back with your arms relaxed. Shoulder blade frames change shape when your arms move.
AvoidDon't let the comb frame cross into the armpit crease. That area stretches and blurs fast.
10. Wave + braid interlock (couples matching-friendly)
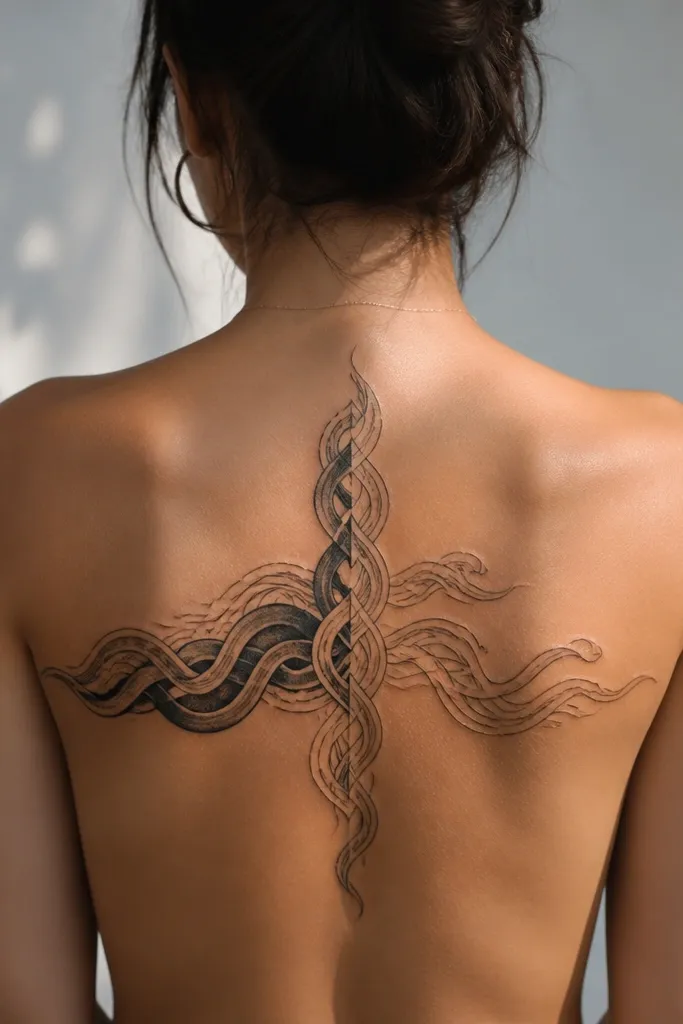
This interlock style reads like movement because the braid bands cross over the waves in a planned rhythm. It's couples-friendly because you can match the overall layout while swapping which side gets heavier fill. The braid lines give you a feminine texture - smooth curves instead of only sharp tribal blocks. It also ages well when the artist uses consistent line width for each braid element.
Draft a center crossing point at mid-back, then build braid bands diagonally so they follow your shoulder blade angle. Keep the waves behind the braids at a medium line weight so the braid remains the foreground. For a matching set, agree on the same crossing point and overall dimensions, then vary the fill density by about one step.
Pro tipBring a photo of your partner's back placement if you're matching. The crossing point height should match, even if the fill differs.
AvoidAvoid random twisting. If the braid direction changes without a pattern, it turns into visual noise.